|
|
| |
|

|
|
|
|
| |
|
|
|
|
Note : This section was written by Avidan Efody (avidan_e@yahoo.com). You are more than welcome to send comments, complaints, corrections or tempting work offers to Avidan Efody.
|
| |
|
|
| |
 |
The Special Features Of e
|
| |
|
|
|
|
The most important thing to say about E is that we should not make a big fuss about it. Around 95 percent of its features, syntax and capabilities will not be a big surprise to anyone who has done a bit of object oriented programming, and the 5 percent left do not make the difference between E and other languages nearly as big as the one between a human and a monkey. In this part I will go over the major features that make E a bit different then the rest. While reading you might find it helpful to consult the proposed E standard which is now on the net (see it here)
|
| |
|
|
| |
 |
Content oriented
|
|
|
E is said by its developers to be content oriented. The term content oriented refers to a bunch of features, which allow the user to extend data structures and methods in other file locations then the ones in which they were originally defined. For example, if you have the following structure:
|
| |
|
|
|
|
  1 // example 1
  2
  3 <'
  4 struct fruits {
  5    apples : uint;
  6    oranges : uint;
  7
  8    sum_fruits_up() : return uint is {
  9       result = apples + oranges;
 10    };
 11
 12 };
 13 '>
You could download file one_day_ex1.e
here
|
| |
|
|
|
|
you can extend it, or in other words, add other member variables, methods, and constraints (more on them below) in another file or in the same file. The methods in the data structure can be extended as well:
|
| |
|
|
|
|
  1 // example 2
  2
  3 <'
  4 extend fruits {
  5    mangos : uint;
  6    papayas : uint;
  7    sum_fruits_up() : return uint is also {
  8       result += mangos + papayas;
  9       // the last value written into result is the one that will be returned from the
 10       // method. Note that if in the original method I would have written instead:
 11       // return apples + oranges;
 12       // I would not have been able to extend it.
 13    };
 14 };
 15 '>
You could download file one_day_ex2.e
here
|
| |
|
|
|
|
Apart from being a nice feature, the best thing about the content oriented approach is that it allows you to add constraints on the random generation of variables, from other files. This is extremely useful for directing your tests. Usually, when you write the part that generates the inputs (inputs mean also packets, CPU model or whatever), you want it to be as general as possible and generate all the possible inputs. However, when you start testing your design, you normally want to check it feature by feature, starting from the most basic features and then proceeding to the more exotic ones. Therefore, at the start you add, through extensions, a lot of other constraints on your inputs to your test file, in order to direct your verification to the basic features only. As the verification advances, you start removing the constraints from your tests, thus letting your verification reach other features as well. You will probably even create special tests, which, through another set of constraints, will direct your verification to these more complicated features.
|
| |
|
|
|
|
|
| |
|
|
| |
|
Generation and Constraints
|
|
|
As mentioned before, random generation works with constraints. Most of the inputs of a design are limited to a specific range, follow a certain order and, in general, are not totally random. For example, the size of an Ethernet packet is between 64 and 1500 bytes and the data contained in every field must obey certain rules. A CPU or a bus controller must perform its operations in a certain order and so on. Constraints are usually the rules that define the allowed behavior for the inputs of a design. Here is a basic example:
|
| |
|
|
|
|
  1 // example 3
  2
  3 <'
  4 struct  packet_s {  // structs are more or less like classes or structures in C,
  5                     //I will talk more about them later on
  6
  7    length : uint;
  8    // This is a regular field that will be given a random value within the
  9    //relevant constraints when a new packet is
 10    // created.
 11    keep length >= 10 and length <=20; // length of the packet in bytes
 12
 13    %header1 : byte;
 14    // The percent sign indicates that this field is a real part
 15    //of the packet, which will be sent (physical field).
 16    // The  length field for example is a virtual field and
 17    //will not be sent. After the packet is created,
 18    // you can translate it into bits using a method of every
 19    // struct called pack() (which is a lot like
 20    // the serialize() method that C++ provides for writing
 21    //data structures into a file).
 22    // pack() translates all the real, physical fields
 23    //into bits and then concatenates them.
 24
 25    keep header1  ! = 0; // header1 can get any random value except 0
 26
 27
 28    %header2 : byte;
 29    keep header1 <  128 => header2  ! = 0;
 30    // The Value of header2 depends on the value of header1.
 31    // If header1 is smaller than 128
 32    // header2 must not be  equal to zero. If header1 is
 33    // equal or greater than 128 header2 can get any value.
 34    // Note that header1 is assigned a  random value (generated)
 35    // before header2 because header1 is defined above header2.
 36
 37    %data : list of byte; // data is a list of bytes
 38    keep data.size() == length-2;
 39    // size() is a method of every list. One of the best things
 40    // about Specman is the large
 41    // number of predefined methods for list  objects.
 42    // When a list is randomly generated
 43    // the size of the list is also random. The constraint
 44    // assures that the length of the packet
 45    // including the two header bytes will in fact be  equal
 46    // to the  field length
 47 };
 48 '>
You could download file one_day_ex3.e
here
|
| |
|
|
|
|
You can see that constraints are usually static struct members. However, it is possible to assign random values to fields in sequential code too, in other words, in a method. It is my recommendation that you use static generation only where it is really needed, since debugging static code can be quite a headache, and is definitely much more complicated then debugging sequential code. for more information on this issue see this link
|
| |
|
|
|
|
A struct is usually generated on the fly (i.e., during runtime) at the time that you would like to use it. Note that time in Specman means simulation time and not the computer system time, but that is not such a big difference from the programmer point of view (I will talk more about that later). For example if your design is a router that gets a new packet every 10 uS of simulation time, you should generate a new packet every 10 uS. This might be done in a method that is aware of the simulation time. The following example shows how this is done:
|
| |
|
|
|
|
   1 // example 4
   2
   3 <'
   4 extend sys {
   5    // ‘sys’ is a unit that is automatically generated by Specman. During the
   6    // generation of ‘sys’ all its fields, including other unit instances, are
   7    // generated. These unit instances generate other unit instances until
   8    // all the unit instances in your hierarchy are generated. In this case, for
   9    // example, the generation of ‘sys’ leads to the generation of “chip_env”,
  10    // which is an instance of “chip_env_u”. In its turn, the generation of
  11    // “chip_env_u”, causes the generation of “packet_generator”, which is
  12    // an instance of “packet_generator_u”, and of “packet_driver”, which is
  13    // an instance of “packet_driver_u”. Other units might be instantiated by
  14    // these units, or directly by “chip_env”.
  15    // Verisity recommends that you do not make ‘sys’ the root of your
  16    // hierarchy.In other words, sys should instantiate only one unit, in this case
  17    // “chip_env_u”, and this unit should start all the other branches of your
  18    // hierarchy. Following this suggestion is supposed to make integration of
  19    // several  environments easier.
  20
  21    chip_env : chip_env_u is instance;
  22 };
  23
  24
  25
  26 unit chip_env_u {
  27
  28    //...
  29
  30    event clk_sys is rise('clk_sys')@ sim;
  31    // When the signal “clk_sys” in the design goes from '0' to '1' this event will be emitted
  32    // (see more in the "temporal expressions"  section below). The events for the main clocks
  33    // in your design should be located at the root of the hierarchy since they are used by almost all
  34    // units and therefore must be easily accessible from anywhere.
  35
  36    //...
  37
  38    packet_generator : packet_generator_u is instance;
  39    packet_driver : packet_driver_u is instance;
  40
  41    // It is recommended to separate between the “generator”and the “driver”.
  42    // The generator is responsible for the generation of ‘high level’ data
  43    // structures, such as packets. The driver translates the ‘high level’ data
  44    // structures into bits and bytes and implements the physical  level
  45    // protocols. This divide, which might seem a bit forced and unnecessary
  46    // sometimes, should be strictly kept for better code reuse (see more below).
  47
  48    //...
  49 };
  50
  51
  52
  53 unit packet_generator_u {
  54    // unlike a struct, which may be generated on the fly using the  ‘gen’ command (see below in this example),
  55    // a unit can not be generated on the fly. It is generated once when the simulation starts and
  56    // destroyed when the simulation ends. However, a unit is not just a degraded struct since there are
  57    // some statements that can be placed only inside a unit.
  58
  59    p_env : chip_env_u;
  60    // This means that “p_env” is a pointer to a “chip_env_u” unit.
  61    // Note that “p_env” is not an actual “chip_env_u” unit. To define a
  62    // real “chip_env_u” unit, you must add ‘is instance’ at the end as
  63    // shown above in the extension to ‘sys’
  64    keep p_env == get_enclosing_unit (chip_env_u);
  65
  66    // The unit “packet_generator_u” is instantiated by “chip_env_u”.
  67    // Since the hierarchy of units is fixed (units are static objects), it can
  68    // always get a pointer to its father by calling the global E method
  69    // “get_enclosing_unit()”. In this case when the pointer “p_env” is
  70    // generated, it is assigned with a reference to the father.
  71
  72    p_driver : packet_driver_u;         // This is another pointer, this time to the object “packet_driver”
  73    keep p_driver == p_env.packet_driver;
  74    // “p_env” is generated before “p_driver” since it is located higher in the file.
  75    // Since “p_env” already references the object “chip_env” we can use it in
  76    // order to initialize the pointer to the driver.
  77
  78    //...
  79
  80     ! last_packet_time : time;
  81    // The exclamation mark means that this field should not be assigned a random value when the unit is
  82    // generated. The default value is zero.
  83
  84    event rdy_to_send is true('ready_for_pkt' === '1') @ p_env.clk_sys;
  85    // When the signal “ready_for_pkt” in the design will be '1' at the system clock edge, this
  86    // event will be emitted (see more in the "temporal expressions" section below). The event “clk_sys”
  87    // is a part of “chip_env_u”. Therefore it is accessed through the pointer “p_env”.
  88
  89    packet_gen()@ rdy_to_send is{
  90       // A method defined in this way is called TCM or Time Consuming Method. Unlike regular
  91       // method a TCM is not executed in zero simulation time: It can wait on events from the DUT or from
  92       // E. The event “rdy_to_send” is called the sampling event. When this event occurs, the TCM wakes up
  93       // and proceeds along its line of execution until it encounters a time consuming action such as ‘wait’
  94       // or ‘sync’.
  95
  96       while(TRUE) { // Written in this form the while will run until the  simulation ends.
  97
  98          var packet : packet_s; // This is only a declaration, i.e., it is only used by  the compiler.
  99
 100          if sys.time – last_packet_time >= 10 {
 101             // sys is an object that exists in every Specman simulation (more about it later). sys.time holds
 102             // the simulator time. Note that this line will be evaluated only when “rdy_to_send” occurs.
 103
 104             gen  packet;
 105             // Only here the packet is really generated and the different fields are given a random value.
 106
 107             packet_driver.drive_packet(packet);
 108
 109             // This line calls the method “drive_packet()” of “packet_driver” which is an instance of
 110             // “packet_driver_u”.
 111
 112          }else{
 113             wait cycle; // wait until the next time my_event happens before you check the condition again.
 114          };
 115       };
 116    };
 117
 118    run() is also {
 119       // The method “run()” is a predefined method of every struct or unit.
 120       // This means that even though not defined in the code above, it is already defined automatically by E.
 121       // The “run()” method of all the units in the design is automatically executed after the simulation
 122       // starts running. In this case it starts the TCM “packet_generator” that will continue to
 123       // generate packets until the simulation ends.
 124
 125       //...
 126
 127       start packet_gen();
 128       // A TCM is a separate execution thread that has to be launched. The TCM “packet_gen()” will now
 129       // work in parallel with other processes in the system until the simulation ends.
 130    };
 131 };
 132
 133 unit packet_driver_u {
 134
 135    //...
 136    drive_packet()@ p_env.clk_sys is {
 137       //...
 138    };
 139 };
 140 '>
You could download file one_day_ex4.e
here
|
| |
|
|
|
|
A unit is generated at the simulation zero time. This is why a unit is called a static element and a struct is called a dynamic element, more or less like the main window (static object) and a pop up menu (dynamic one) in an application.As mentioned in the comments above, In order to instantiate a unit you must declare it under the object sys, which is generated for every new simulation. For example:
|
| |
|
|
|
|
  1 // example 5
  2
  3 <'
  4 extend sys {
  5    chip_env : chip_env_u is instance;
  6    // Specman support recommends not to put your units directly under sys, but to create another level.
  7 };
  8
  9 unit chip_env_u {
 10    // other units in the design ...
 11    packet_driver : packet_driver_u is instance;
 12 };
 13 '>
You could download file one_day_ex5.e
here
|
| |
|
|
|
|
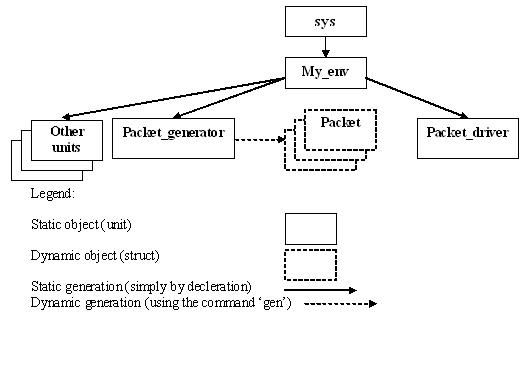
Now, when we generate the test the sys object will be first generated, then the object chip_env, an instance of chip_env_u, which is supposed to hold all the other units in the design. Then the unit packet_driver, an instance of packet_driver_u”, will be instantiated. After the generation is complete you can run the simulation. Once you do, the run() method of all the units under sys will be called and the packet_sender() TCM will be started. This TCM in turn, will generate packets on the fly every 10 uS until the simulation ends.
|
| |
|
|
|
|
The diagram below shows how the objects in our simple environment are created:
|
|
|
 |
| |
|
|
| |
|
'When' Inheritance
|
|
|
E supports two types of inheritance. The first type, using the keyword like is just like a normal inheritance in every object oriented language. The other type, using the word when is inheritance which is based on the value of a random variable. This is best suited for the generation of packets of different information protocols. In such packets it is common for the length and content of fields, to change considerably according to one field in the header of the packet. For example, we will add to our packet from above a checksum field, which will exist only if the LSB of the field header1 is '1'. In order to do this we will add a boolean non-physical field named with_checksum. When with_checksum is FALSE we will force the LSB of header1 to have a value of '0' and the field checksum will not be added. When with_checksum is TRUE we will force the LSB of the header to have a value of '1' and a field called checksum will be added. This is how you do it:
|
| |
|
|
|
|
  1 // example 6
  2
  3 <'
  4 struct  packet_s {
  5
  6    length : uint;
  7    keep length >= 10 and length <=20;
  8
  9    with_checksum : bool;
 10    // This Boolean variable will be generated randomly. If it is FALSE the packet will not have a field called
 11    // “checksum” at the end and the LSB of the field “header1”  will be '0'. If it is TRUE a field called
 12    // “checksum” will be added to the packet through a WHEN inheritance and the LSB of the field
 13    // “header1” will be '1'.
 14
 15    %header1 : byte;
 16    keep header1  ! = 0;
 17
 18    keep with_checksum == FALSE => header1[0] == '0';
 19    // If the packet is without checksum the first bit of the field “header1” will be '0'
 20    keep with_checksum == TRUE => header1[0] == '1';
 21    // otherwise it will be '1'
 22
 23    %header2 : byte;
 24    keep header1 <  128 => header2  ! = 0;
 25
 26    %data : list of byte;
 27    keep data.size() == length-2;
 28
 29    when TRUE'with_checksum { // When the field “with_checksum” is TRUE
 30
 31       %checksum : byte;         // an extra field called “checksum” is added to the packet.
 32       keep checksum == data.xor();
 33       // The value of the new field is equal to the “xor()” of all the bytes in the data list
 34       // You can look up the “xor()” method of a list on the e manual on the net.
 35    };
 36 };
 37
 38 '>
You could download file one_day_ex6.e
here
|
| |
|
|
| |
|
|
| |
|
Temporal expressions
|
|
|
Just like the processes in a regular program are triggered by system events such as user clicks on buttons or windows, or timers, the processes in an E program are triggered by events from the simulator such as specific signals rising or falling, or at a certain simulation time. For example, take another look at the method packet_gen() and the event rdy_to send from the unit packet_generator_u, shown above and copied below for your convenience:
|
| |
|
|
|
|
  1 // example 7
  2
  3 <'
  4
  5 unit packet_generator_u {
  6
  7    //...
  8    event rdy_to_send is true('ready_for_pkt' === '1') @ clk_sys;
  9
 10    packet_gen()@ rdy_to_send is {
 11       while(TRUE) {
 12          var packet : packet_s;
 13          if sys.time - last_packet_time >= 10 {
 14             gen  packet;
 15             send(packet);
 16          }else{
 17             wait cycle;
 18          };
 19       };
 20    };
 21 };
 22 '>
You could download file one_day_ex7.e
here
|
| |
|
|
|
|
The event rdy_to_send will be emitted whenever the signal ready_for_pkt, which is a signal in our Verilog or VHDL design, will be equal to '1' and the event clk_sys happens (The triple equality sign is to prevent the expression from getting a true value when the Verilog or VHDL signal is 'X', 'Z' etc.). The event clk_sys happens whenever the signal clk_sys in our Verilog or VHDL design, rises, or goes from 0 to 1 and the event sim happens. The event sim is a predefined Specman event (i.e the user does not have to define it). This event is emitted whenever the simulator calls a Specman callback function (see the how does Specman work section above). The simulator calls a Specman callback function for for every change in a signal that is used by Specman (and usually a lot more often).
|
| |
|
|
|
|
It is important to understand that the expression rise(clk_sys) is calculated every time that the event sim happens. Since the event sim usually happens a lot more often then a clk_sys rise, this means that we waste a lot of time in unnecessary calculations. For this reason it is recommended to use sim as little as possible. For example, if we know that the signal ready_for_pkt is sampled (i.e. looked at) only on a clk_sys rise, we will evaluate it only at this specific event and not every time that sim happens. Usually, the event sim should be used only for the system clocks. All other events (unless they are not in sync with the clock events which is rare) should use one of the events defined for the system clocks as their sampling (or evaluation) point. The system clocks events are usually defined in the unit, which is at the top of the hierarchy, so that they will be accessible to all of the hierarchy below. For example, as shown above, the event clk_sys is defined in the unit chip_env_u and is accessed through a pointer to this unit from all the other units in the design
|
| |
|
|
| |
|
|
| |
|
|
|
|
|
| |
|
|
|
|